

After putting this kit away over 12 years ago, I have once again picked it up and will finish it. At this writing, essentially all of the scratch building is complete. Below is the text I added to a website chronicling the build.
Although this kit is a newer release (1992 vs. 1960's - 1970's) than the Revell 1/32 kits I have done in the past, it is not much better in terms of sophistication, in fact in some areas it is worse. Exterior outline of the model is very good but that's where its attributes end. Interior and some structural details (struts, tires, prop, engine) are extremely lacking or grossly inaccurate. Unbelievably, the model includes an approach light in the port wing leading edge but no landing and taxi light underneath. Therefore everything from the kit except the basic airframe is going to get scrapped and new details or assemblies scratchbuilt. These areas include the cockpit, wheel wells and struts, wing gun installation, tires, propeller and engine. Additionally, I will build it up from the firewall forward and completely detail the inside of the cowling.
This kit does include the option of building it as a -3 or -5 variant. The most notable differences being the two are the bulge over the exhaust stubs, eliminated after aircraft. #1500 of the -3, the window aft the cockpit, eliminated after aircraft. # 2000 of the -5, a simplified windscreen and the addition of rockets and bomb hardpoints with the -5 (no bombs are included and the 2.75" rockets in the kit fall way short of the target in the detail arena) .
I chose to build the aircraft in the -3 configuration with markings for (then) LTJG Alexander Vraciu's No. 19 "Gadget", stationed with Fighting Squadron Six (VF-6) aboard USS Intrepid (CV-11 ) in 1943. Techmod does make an outstanding aftermarket decal sheet, which I will use.
Since I began this model, Trumpeter has since released their own 1/32 Hellcat. Although it is miles ahead of this kit in terms of sophistication, it will still fall way short of what I will accomplish with this rebuild. Some of that is the due to the limitations of the molding process, but a good bit is due to the Trumpeter philosophy that less is more and you should charge exorbitant amounts of money for it, plus the fact that no one would ever buy a kit with well over 3000 pieces in it!!!
I am deeply grateful to Alex Vraciu, CDR, USN (ret.) for all the help he has provided me during the building and research process, he has been a tremendous source of information that I cannot find in any other reference source and has provided me many first hand accounts of what it was like to be in the middle of the Marianas Turkey Shoot. As a former Naval Aviator with combat experience myself, I am in absolute awe of the accomplishments of these bravest of the bravest of warriors.
Sadly, Alex passed away on January 29, 2015, long before I finished this model.

(Then) LTJG Alex S.Vraciu after he claimed 6 "Judy" dive bomber kills in 8 minutes during the Marianas Turkey Shoot on 19 June 1944 earning him the Navy Cross
The Cockpit
As is customary with me, I began with the cockpit. What is there to say about the kit cockpit besides that it belongs only in the trash. It is very primitive and very generic in details. Waldron makes an outstanding cockpit placard set and I chose to use their instruments and seatbelt hardware to complement what turned out to be total scratch building of the cockpit. Once I started comparing the kit pieces to the drawings it became immediately apparent that the kit floor was about 7mm too high. This necessitated chucking the rear bulkhead for use as a template. Instead I used the contour gauge to make a new rear bulkhead and firewall.
The floor and rear bulkhead were cut from sheet styrene, as was the instrument panel bulkhead (the actual panel itself will be attached to this bulkhead). The attachment brackets for the rudder pedals are now in shape, as are other bulkhead details. The two cross stiffeners were shaped from styrene "I" beam. The Hellcat had a floor, unlike the Corsair and Wildcat, and foot troughs attached to the floor. The troughs were cut from a piece of styrene I-beam. Some small pieces of styrene strip were used for spacers underneath.
The rudder pedals were scratch built from styrene, brass and steel. The stick was made from brass rod and both the stick and the elevator connecting rod actually pivot. This is more to make installation in the cockpit once it is ready to be put together but it was also fun to just make it articulate! I will most likely leave it loose once the cockpit is together. The emergency hydraulic hand pump handle on the right side of the cockpit floor (below) also pivots, again to make it easier to position once the cockpit is together.


The seat is made from soda can aluminum. It is much closer to reality in thickness and is, in many ways, easier to work with than styrene. I used a piece of 0.015" solder along the top to simulate where the metal was rolled. the CA for the most part works well to bond the pieces together. I used a file to smooth the glue seams. A sharp #11 blade works very well to cut the aluminum. The frame was constructed of styrene sheet and rod.
The simplest way I have found to do this is to use a 3 x 5" index card, draw out your master for this part, cut it out and transfer the pattern to the aluminum with a very sharp needle. One need only score the aluminum with a sharp #11 blade and it will break very easily upon bending.

Next, the side consoles, instrument panel and other detail the rear bulkhead was cut from styrene sheet and the fuselage fuel tank (made from 1/2" styrene tube) attached to it. Additional details were added with styrene strip and rod and stringers added to the fuselage between the ribs. I went to this level of detail as it will be visible through the small windows directly behind the cockpit
The placard set for the Hellcat, like all the other ones, goes farther to dress up the cockpit than any other single item. The details on the sidewalls are a combination of styrene, solder, lead foil, wire and soda can aluminum. The right console contained spring steel clips to hold 6 rounds of flare pistol ammo. I wrapped a thin strip of aluminum around a 0.025" drill bit, snipped it off with a pair of surgical scissors and glued it in place with CA. A minor detail but one that adds a lot to the console.
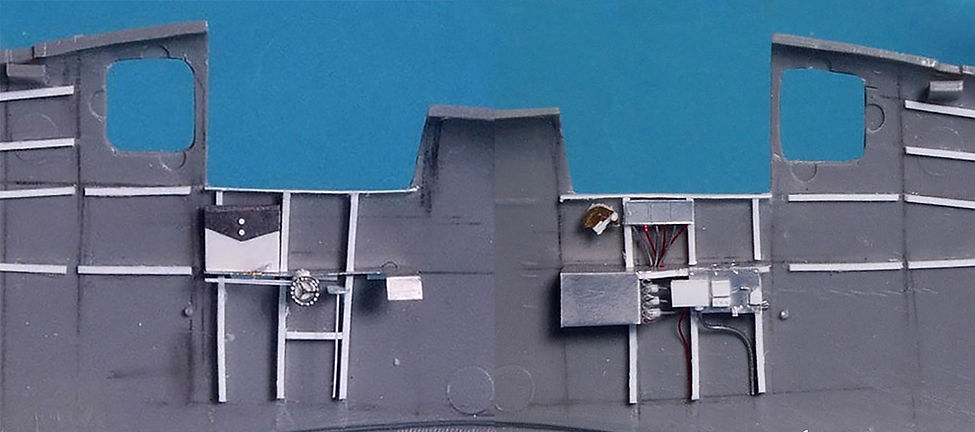
The left side with everything installed prior to finishing

The main and supplemental instrument panels were cut from soda can aluminum. This is easier to work with than styrene and has a more scale thickness effect. I punched holes through the sheet with the Waldron punch set. The aluminum sheet is only 0.004" so it poses no problems for the punches, just be sure to oil them beforehand. The rivets around the instruments were added with a #80 drill bit and the knobs are 0.018" punched disks. I will add Waldron instruments and other small details before installation.

With everything constructed, it's time to paint things and add the Waldron cockpit placards and instruments. The seatbelts are made from thermal paper, the kind you get for a gas station receipt. It is thinner than regular paper yet it is finer in grain and stronger. It takes paint very well. The hardware is from Waldron.


The Engine
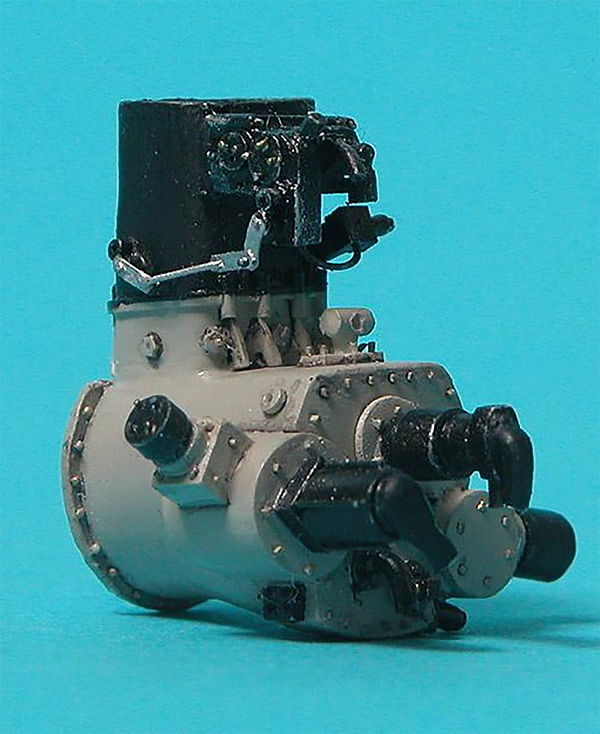
With the cockpit finally complete, it is time to turn my attention to the engine, firewall and everything in between. I decided to pitch the kit engine. The detail on the cylinders is soft and overall the detail is somewhat lacking. Plus, no detail is provided past the back edge of the crank case. As I have done on two previous 1/32 P&W R-2800 powered aircraft, I decided to replace the kit engine with the Teknics one, now marketed by Meteor. It is superbly cast and provides a great starting point for super detailing. It too, however, stops at the back of the crankcase. I started with a piece of solid acrylic rod (all I had that was the right size diameter) and added styrene rod, strip and stock to build the accessory section. The rivets are made from pieces of 0.010" rod inserted into holes and snipped off with a pair of very sharp surgical scissors. The actuators are made either from steel wire or 0.010" styrene rod. Pieces of soda can aluminum were also used.
I began with the accessory section. I started with a piece of solid 1/2" acrylic rod and added all the accessories from there. They were constructed almost entirely from styrene sheet, rod and strip, along with a lot of punched discs using the Waldron punch set. I used some wire and soda can aluminum for some of the finer linkages and such.

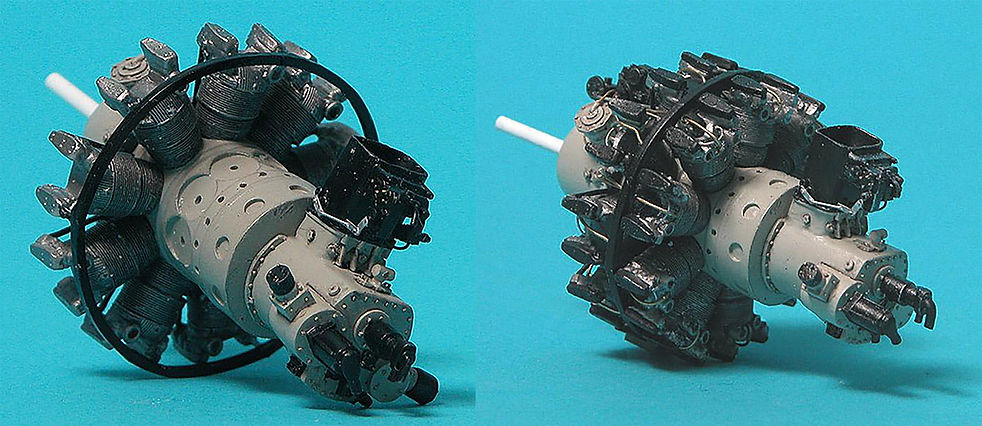
The Meteor resin Pratt and Whitney R-2800 engine is truly a kit unto itself. However, like nearly all other manufacturers, Meteor left out the ring that separates the cylinder banks. It is an integral part of the engine as it provides some structural support, attachment for the heat shields atop the cylinders and a routing area for the ignition wires. I constructed a ring from 0.040" square styrene strip. It was attached to three cylinders with a piece of styrene rod. This was actually not how it was attached but this was the simplest way to do it. The pins were hidden once the shields were in place. I made a template for the shields on MS PowerPoint and printed them on 0.005" clear styrene (yogurt lids) with the ALPS. I cut them out and attached them to the ring with CA. The thinness of the plastic made it easy to follow the contours. Once it was dried it was pressed down into the curve of the cylinder heads. A hole was drilled in the center of each so the wire going to the back cylinders had a place to go.

With the engine finally finished, it is time to turn my attention to the firewall and everything forward of it. This is going to be a long process. As with everything up to this point, everything will be scratch built. The firewall is already complete, having been done when the cockpit was constructed. The Hellcat engine compartment was a maze of wires, hydraulic lines, linkages, oil and hydraulic tanks and accumulators, supercharger intercoolers and associated piping and ducting. This one is going to be quite an undertaking!
The engine mount for the Hellcat is somewhat complex. In order for the Teknics engine to be perfectly centered, it required a lot of care to make sure it was plumb to the firewall in all planes. I taped the cockpit/firewall assembly in place and "measured twice and cut once" to make sure it was perfectly lined up. The extra effort will pay off in later stages. I used 0.062" styrene rod for the entire thing, holding it together with CA and 0.010" metal wire pins. A whole lot of engine of stuff is going to be mounted to this thing. The oil tank (with protective armor plate), a small hydraulic accumulator, two superchargers and ducting, wiring plumbing and connecting rods, and, not to mention the engine itself

The basic oil system for the engine is now complete. The oil tank was carved from a piece of Milliput. Everything else is styrene, wire, lead foil and soda can aluminum. A lot of plumbing is still to be connected to the bottom of the tank. Some will go to the engine and some to the oil cooler assembly at the bottom of the firewall. The small little accumulator attached to the engine mount was made from a piece of styrene tube with a plug of strip styrene at each end. It was placed into the chuck of a drill press and shaped using the Dremel and a shaping bit.
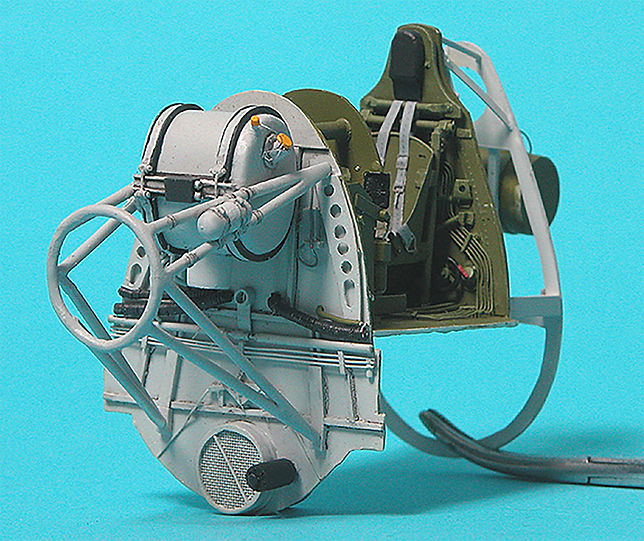
I used 0.062" solder to make the oil lines going to the engine and oil cooler. A piece of lead foil and strips of aluminum foil nicely simulated the rubber vibration fittings connecting the "hard piping". Once the engine was mounted on the engine mount and all the associated plumbing installed, it was necessary to add two 0.125" square stiffeners below the cockpit floor to keep it from bowing under the weight Next up is to build the two supercharger intercoolers and add the ducting. That will add even more weight. "Oil" on the tank and firewall is a combination of Future and brown "The Detailer". It leaves a bit of a sheen like real oil would.

Finally with the engine mounted and all the oil lines "plumbed up", I can turn to making the intercoolers for the superchargers. The Hellcat has a pair of intercoolers for the supercharged air going to the engine. They are mounted on either side of the engine mount and attach directly to the accessory section of the engine. I scratch built them out of styrene. I laminated several pieces together to make the upper piece and shaped it with the Dremel and a cutting bit. The bottom piece is made from styrene sheet cut into strips and styrene rod. Only one side is finished since the other half will be covered with ductwork. I like this stuff but no point doing it if it will be covered up. The duct is styrene tube that was cut at an angle and attached with CA. I used CA to smooth over the joint. The ducts were intentionally left long so I can trim them to length when the time comes to mount them.

When the engine and firewall section was complete, I turned to the cowling, which became a major project in itself. First I cut out the panel to expose the top port part of the engine. I built the oil intercooler and supercharger inlet ducting under the engine with styrene sheet cut to size. When it was all complete, I covered the area over with styrene sheet.
The kit's cowling splitters were removed and scratchbuilt as well. When all that was complete, I added all the structural members inside the cowling using a combination of styrene strip and U-channel. Holes were drilled in the framework where the locking wires for the Dzus fasteners would be. I drilled a small hole (0.0135") on each side of the hole and inserted a piece of 0.007" wire to simulate the locking wire. It's a small detail but it really adds a little extra to the cowling.
I found out later, after talking with Alex on the phone and the two of us looking through his vast library of Hellcat references, that both the bulge over the exhaust stubs and the lower cowl flap were not present on 40467 so they were removed and the holes filled in with styrene sheet.

Before starting all the work on the cowling, I photographed it and scanned the Grumman drawing to see if there was any modifications to be done to it. I increased the transparency of the kit photo and aligned the two; they matched up almost perfectly. Once all the work on the cowling was complete, I again photographed it to ensure my alignment in the cowling was perfect, placing crosshairs at 90º angles. I spent a lot of time ensuring everything stayed on the aircraft centerline during the construction and all the care paid off. The engine looks to be about 1º off perfect centerline, something that is not noticeable to the naked eye.

With everything taped in place, all the work makes for a very realistic representation of the engine and accessory section.
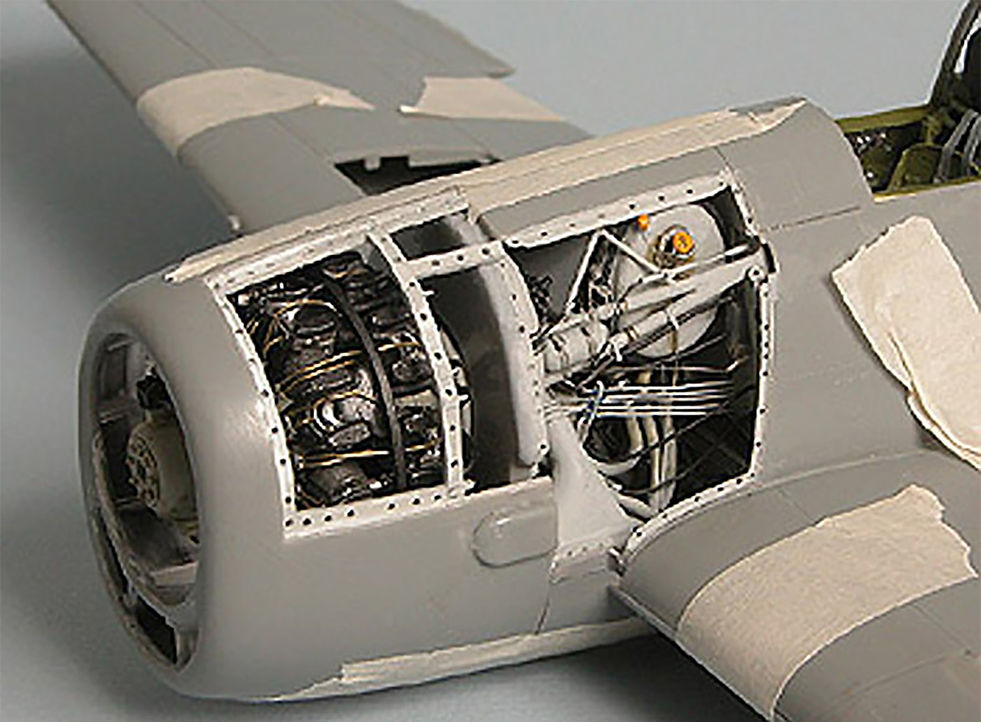
I found out almost immediately that the panels I removed from the accessory section were not going to lend themselves to easy fabrication from soda can aluminum. There is a complex dip where the exhaust stubs are located. I tried several times unsuccessfully to work a piece of aluminum using the kit piece as a master. The only answer was to vacuform it. I added some styrene to the edges that was removed by the saw when the piece was cut out. I placed the kit piece on the perforated table of my vacuform machine and used a piece of 0.010" thick styrene sheet. The result was an outstanding looking panel with a good scale thickness to it.
The kit cowling flaps were totally inadequate so I used them as templates to make new ones out of soda can aluminum. I left the plastic coating on the inside, as mentioned earlier as it makes a better attachment surface for the styrene and CA. The actuators and hinges we constructed out of styrene strip and rod and were made so they would articulate, simplifying installation when that time comes. Male halves of the hinges were attached to the cowling frame and the corresponding female halves attached to the flaps themselves. I will wait until painting is complete to actually attach them as they are very fragile.

With all that behind me it was time to finally put the engine and accessory sections down and turn my attention to the next major undertaking, the wheel wells. I had no idea at the time but quite an undertaking it would become! The kit wheel wells were in line with the rest of the kit; crude and inaccurate so they were removed with a Dremel saw and discarded.

Before starting construction, I made a template for the inboard and outboard rib shapes using a contour gauge. The shape was traced upon a 3" x5" piece of index card and fine tuned so the shape was perfect. I then set them aside in a safe place. I boxed the wheel wells in with 0.015" styrene sheet, using my rib contours as a guide. At this point I did both wheel wells as this was a rather time consuming process and I wanted both wings completed before I started adding interior details.
As it turned out, constructing the main wheel wells proved to be a far more extensive project than I anticipated. I have built entire models from box to bookshelf (out of the box of course) in less time than it took to do just one wheel well. I started with the starboard one and when all was said and done, there was close to 300 pieces of styrene sheet, tube, strip and round and hex rod. The gear uplock assembly alone had over 100 pieces in it. The gear on a Hellcat is offset by 12º. I set the base on my drill press at 12º and drilled holes into a block of styrene strip. This block will form the attachment points for the main gear struts. It was made very sturdily as this is going to be a heavy model and the struts are going to be bearing a lot of weight.

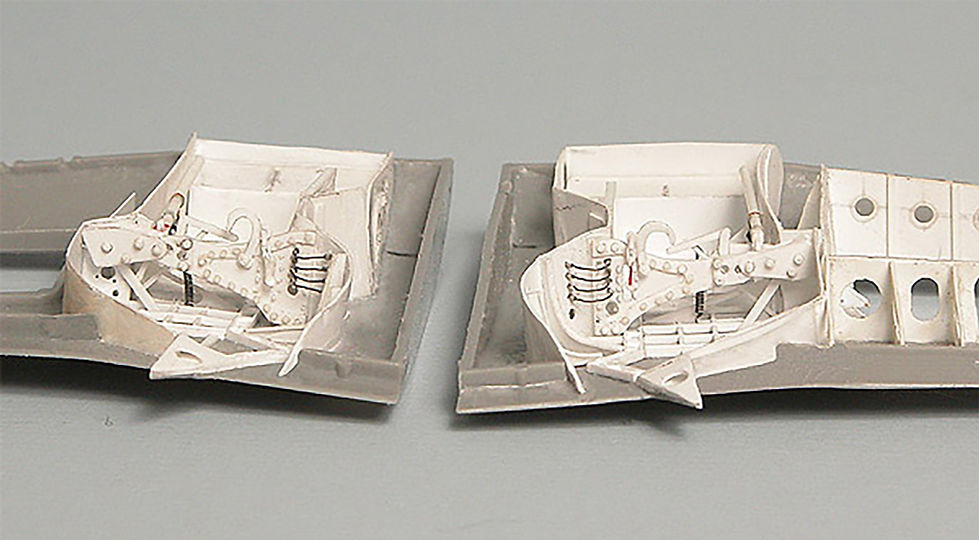

Both wheel wells are finally complete, less the struts and associated linkages, actuators, gears, etc. I decided to cut off the styrene strut attachment pillars on the starboard well because I don't think they will be strong enough to support the weight of the aircraft. Instead I will re-form them from brass rod, grinding the rod to a bar shape where it will be above the strut box.
Before starting the tailwheel well, I separated the rudder from the fuselage halves and ground down the area around the horizontal stabilizer attachment points. The areas over the horizontal stab attachment points were flashed over with styrene sheet as there will be structure over that area. Like the main wheelwells, the tailwheel well has a lot of structure to it. I am fortunate to have a dwg. out of the E&M manual showing all the rib and stringer detail. Detailed and accurate references make all the difference in the world when trying to construct this kind of detail. The rib structure is a combination of 0.010" styrene sheet and various sized of styrene strip and rod.
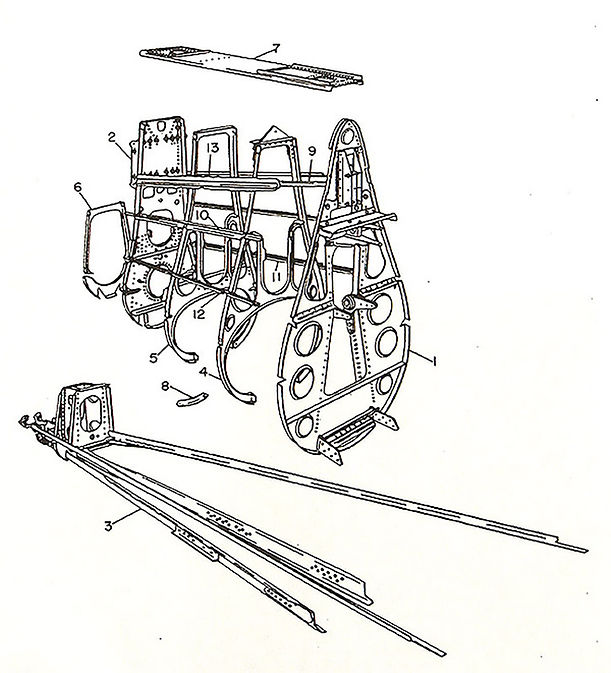
Even though I am working in Braille-scale, the size of these bulkheads are not especially large; the tallest of which is barely over 1.25". Building bulkheads can be a somewhat laborious process and grows more so as the scale becomes smaller. I go about it by using a contour gauge to get the proper curves. I transfer it to a piece of index card, taking care to mark off the top and bottom of the contour. I then fold the card in half, mark the other side and cut it out. I test fit it and make corrections until I have a perfect fit. Then and only then to I transfer it to styrene. If necessary, I will file the piece of styrene until it fits flush. This is a long process but if done carefully, it's foolproof.
When there are cutouts in the bulkhead, which they usually are, I draw them on the piece of styrene with a #2 pencil. Holes are best done with a punch set rather than a drill, it is more precise and will not give you an oval if you are not perfectly perpendicular when you make the hole. If there is a large oval of oblong shape, punch the ends with the appropriate punch and then use a #11 blade and straight edge or chisel blade to connect the holes.
I intentionally made the main tailwheel bulkhead out of out-of- scale thickness styrene sheet because it would be weight bearing. It will not be noticeable when installed because only the front will be visible; but it will be strong enough to support the tail of the aircraft. All holes made in it were done using the previous mentioned techniques.
As mentioned previously, the main bulkhead is constructed primarily of styrene sheet and strip. I added brass fittings from 0.020" sheet for the weight bearing components. I used the Dremel with a cutting bit to cut out the rough shape and then filed to the final shape. Any holes were made with carbide bits, as they are sharper (but a good bit more fragile) than conventional bits and go through the brass quickly and cleanly. I anchored the styrene strip that holds the brass to the main bulkhead with wire pins. I in turn attached the brass to the styrene strip with the same wire pins. This adds strength and rigidity that CA alone cannot provide. Alignment on this was critical as I don't want a crooked tailwheel. I used a 0.030" steel bar through the attachment point for the hydraulic cylinder as a good alignment check. It was near perfect. The majority of the rest of the bulkheads are skeletonized, rather that solid. So it was back to the good old days of Guillows balsawood models. Except with balsa wood models you already had a pattern and die-cut balsa to work with. Here I made my own patterns from the drawings. The original was drawn to scale on a piece of index card, cut out and all the dimensions corrected as necessary. When it's transferred to styrene sheet it has to be right, I hate wasting time and styrene sheet. I used the Waldron Punch Set to make the holes. I made the upper part of the bulkhead by cutting a strip of styrene from 0.010" sheet . I laid it over my pattern and bent it into shape. I cut the top bar and piece from the same sheet and then drilled a 0.033" hole in the top. I sat it next to the completed main bulkhead for comparison. One more smaller, skeletonized and one solid bulkhead are needed to finish this well.


Here are all the bulkheads in place, along with the tailhook track and other various and sundry details. The "chain" was made from styrene strip which was joined end to end and then grooved with a saw. You will have to peer hard into the wheel well to see all of it, but it was still a load of fun to do!
